More Set-up Information
Project dependencies and PYTHONPATH
The Luceda Academy training material is built on:
SiFab, a demo PDK for a Silicon Photonics fab.
Some additional utilities that are used often but that are not yet in the product. The API of the utils might change when added to the product.
In addition, some Luceda Academy tutorials also depend on:
- Foundry PDKs:
Luceda PDK for SiEPIC and SiEPIC Shuksan
Luceda PDK for Cornerstone SiN
Luceda PDK for Ligentec AN150
Luceda PDK for AMF
- Additional libraries built on top of PDKs:
pteam_library_si_fab
pteam_library_siepic
pteam_library_cornerstone_sin
To be able to use this training material, these folders have to be added to the PYTHONPATH (What is the PYTHONPATH?). This is an environment variable which you can set to add additional directories where Python will look for modules and packages. You can set the PYTHONPATH to look for the PDKs and/or libraries that you want to use as source directories for your designs.
Normally, these folders are added automatically through a configuration file shipped with Luceda Academy (contained in the .idea folder).
Should you start from your own project, add the following folders to your PYTHONPATH:
‘pdks/si_fab/ipkiss’
‘additional_utils’
‘pdks/siepic/ipkiss’
‘pdks/cornerstone_sin/ipkiss’
‘pdks/cornerstone/ipkiss’
‘pdks/tyndall_packaging/ipkiss’
‘libraries/pteam_library_si_fab/ipkiss’
‘libraries/pteam_library_siepic/ipkiss’
‘libraries/pteam_library_cornerstone_sin/ipkiss’
‘designs/retargetable_mzi/common’
‘designs/retargetable_library/common’
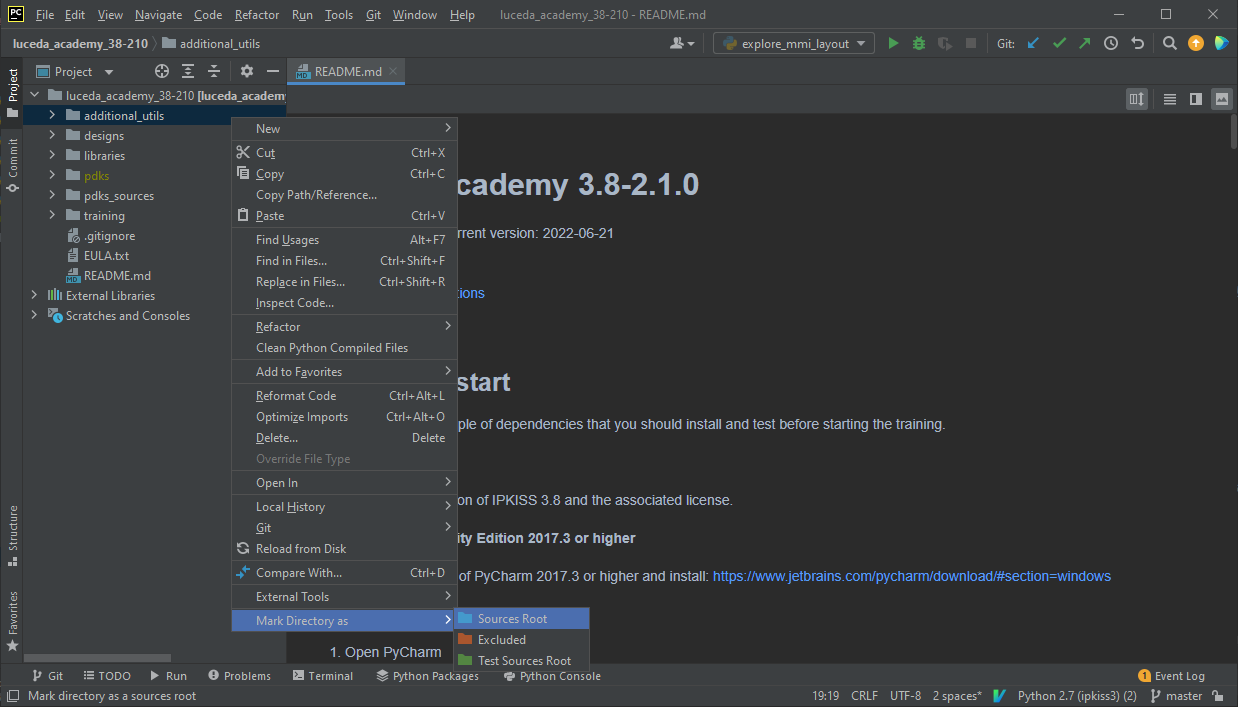
To add a folder to your PYTHONPATH, right click on it and select on “Mark Directory as…” > “Sources Root”.
License types
There are two types of licenses: node-locked and floating licenses.
Node-locked license: this type of license is tied to a specific computer. This means that it cannot be used on other computers. The license is fully described by the license file which needs to be installed on the computer to which it is locked. A node-locked license is locked to a host id, which is the serial number of a hardware part of the computer (disk or network card).
Floating license: in this case, there is no restriction on which computer you can run the software, but you are limited to a certain number of licenses. Floating licenses are hosted through a license server and hence requires some setup, which may require the assistance of your computer or network administrator. Every computer on which you want to use the software needs a license file installed, which will inquire this license server. To set up this type of license, please refer to setting up the reprise license server.
Obtaining and installing a license
A license file can be obtained through Luceda. Please email info@lucedaphotonics.com if you would like to purchase a license. Licenses can be of two types and require the following information:
For node-locked licenses, we will need the MAC address of the network card of the machine that will run the software.
For floating licenses, we require the MAC address of the network card of the license server as well as whether or not it is a virtual machine. Please refer to setting up the reprise license server.
During the process of obtaining a license from Luceda, you will be asked for the above information. Once you have provided the above information, we will send you the license.
Obtaining the MAC address is differs slightly between Windows and Linux.
On Windows, open a command prompt and type ‘ipconfig /all’. Then, scroll down until you see the heading ‘Ethernet adapter Ethernet’. Next to ‘Physical Address’, you will find the MAC address corresponding to your Ethernet port, which is a physical port and so of the type we want.
On Linux, open a terminal and type ‘ip addr show’. You will find a list of ports together with their MAC addresses. Please use the MAC address of a physical interface (such as an Ethernet port).
Once you have obtained the license file, please follow the following instructions to install it. Open the Luceda Control Center and click ‘Product License’. Then click ‘Add License’ and navigate to the license you want to add. If this doesn’t work, you can copy-paste the file to that folder manually.
Note
License files use standard ASCII encoding. Please do not change them and do not insert non-ASCII characters. Non-ASCII characters, such as non-roman or non-English language characters occuring in person and institution names will be converted to ASCII by Luceda automatically when generating a license file.
Configuring a floating license
Hosting the license server
Before being able to use a floating license, your license administrator needs to install the license server and host the license from that server. The instructions are found here: setting up the reprise license server.
Using your floating license
As explained in Installing the license, the floating license also needs to be placed in the Python environment folder.
For Windows, it is at C:\luceda\luceda_3112\python\envs\ipkiss3 for example; for Linux, it is at /home/username/miniconda/envs/ipkiss_3112.
Additionally, please make sure the location of the license server is set correctly to the URL of the server that hosts the license. To prevent interference with the license server or RLM’s web server, it is recommended to set the ISV server port to something other than 5053 or 5054.
You can find these configuration settings in your ‘.lic’ file under the title “location of the license server”. For example:
# Location of the license server
HOST myserver.mycompany.com 1021486dc38f 5053
It means:
HOST: indicates the license server information.
myserver.mycompany.com: the location to the server. You have to modify this so it points to the correct server.
1021486dc38f: the hostid of the server. This should already be set up properly and should not be modified.
5053: the port to connect to (5053 is the default port and typically doesn’t need to be modified).
Remember to replace myserver.mycompany.com with the server address.
An alternative approach is to set the luceda_LICENSE environment variable.
Certainly when you use multiple environments, this can be more convenient than using a file.
For example on windows you can execute the following to set the environment variable.
setx luceda_LICENSE 5053@mylicenseserver.com
on Linux you could put the following in your .bashrc file:
export luceda_LICENSE=5053@mylicenseserver.com
Troubleshooting
We will assist you if you are experiencing difficulties with your license or installation. To help us find the cause, we kindly ask you to download our Diagnostics Tool from https://www.lucedaphotonics.com/my/home#download-links.
If you don’t have access to the link, please submit a support ticket through support@lucedaphotonics.com.
Running diagnostics on Windows
Unzip the
luceda_diagnostics_tool.zipfileRun (by double-clicking)
luceda_diagnostics_tool_py27.batorluceda_diagnostics_tool_py38.bat, depending on whether you are using the Python 2 or Python 3 installation of IPKISS.A zip file named
luceda_diagnostics.zipwill appear in the same folder.Please send this zip file to support@lucedaphotonics.com.
If you have a Python IDE (i.e. PyCharm), you can also go through the following steps.
Unzip the
luceda_diagnostics_tool.zipfileRun
luceda_diagnostics_tool_windows.py(with your Python IDE) in the IPKISS environment.A zip file named
luceda_diagnostics_py.zipwill appear in the same folder.Please send this zip file to support@lucedaphotonics.com.
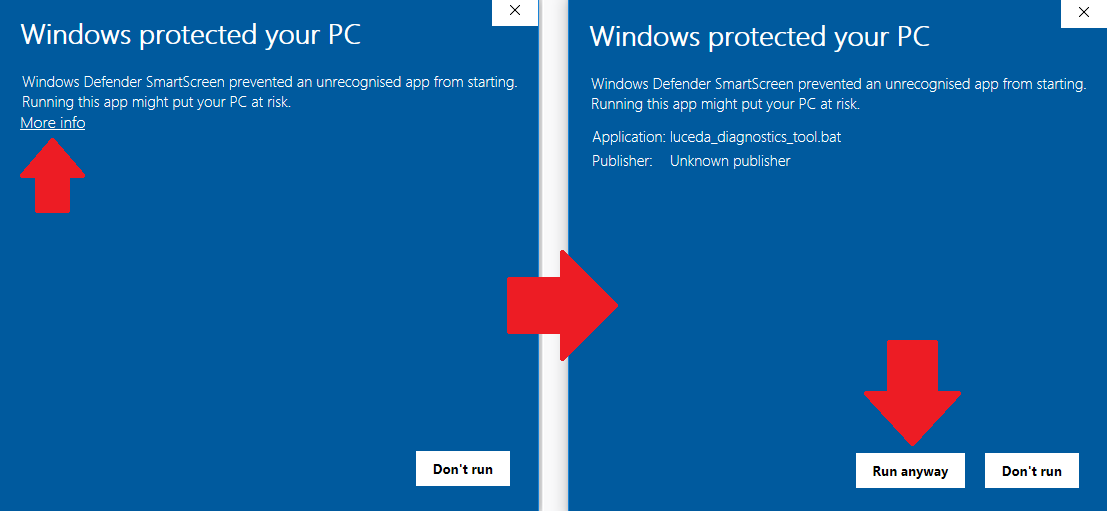
Windows may warn you when you try to run the .bat file and show you the following message. Just click on [More info] and then on [Run anyway]:
Running diagnostics on Linux
Unzip the
luceda_diagnostics_tool.zipfileRun
luceda_diagnostics_tool_linux.py(with your Python IDE, or in terminal) in the IPKISS environment,A zip file named
luceda_diagnostics_py.zipwill appear in the same folder,Please send this zip file to support@lucedaphotonics.com.
While waiting for a response you can have a look at the diagnostics files in the zip file(s) to identify possible issues.
Note
These diagnostics tools gather information about your computer. If you wish to omit certain information before sending it to us, you can easily edit the text files within the zip file(s).
Information we send by default:
location of installed IPKISS,
list of packages in your IPKISS conda environment,
list of available conda environments on your computer,
license checkout tests,
your computer environment variables.
Troubleshooting Luceda Academy
Training samples don’t run
Check that the configured Python interpreter is set up correctly by making sure it points to C:\luceda\luceda_3112\python\envs\ipkiss3\python.exe (Windows) or /home/username/miniconda/envs/ipkiss_3112/python (Linux).
In PyCharm, you can verify the interpreter path in the bottom-right corner of the window.
If the Python interpreter was not set up correctly, fully close PyCharm, delete the .idea directory in the training material folder (%USERPROFILE%\luceda\luceda_academy\luceda_3112), open the control center and click the button to open the training material again.
If that does not work, proceed to the manual installation steps described below.
Manual setup
If opening the training material from the Luceda Control Center did not work as intended, you can manually set it up using these steps:
Open PyCharm.
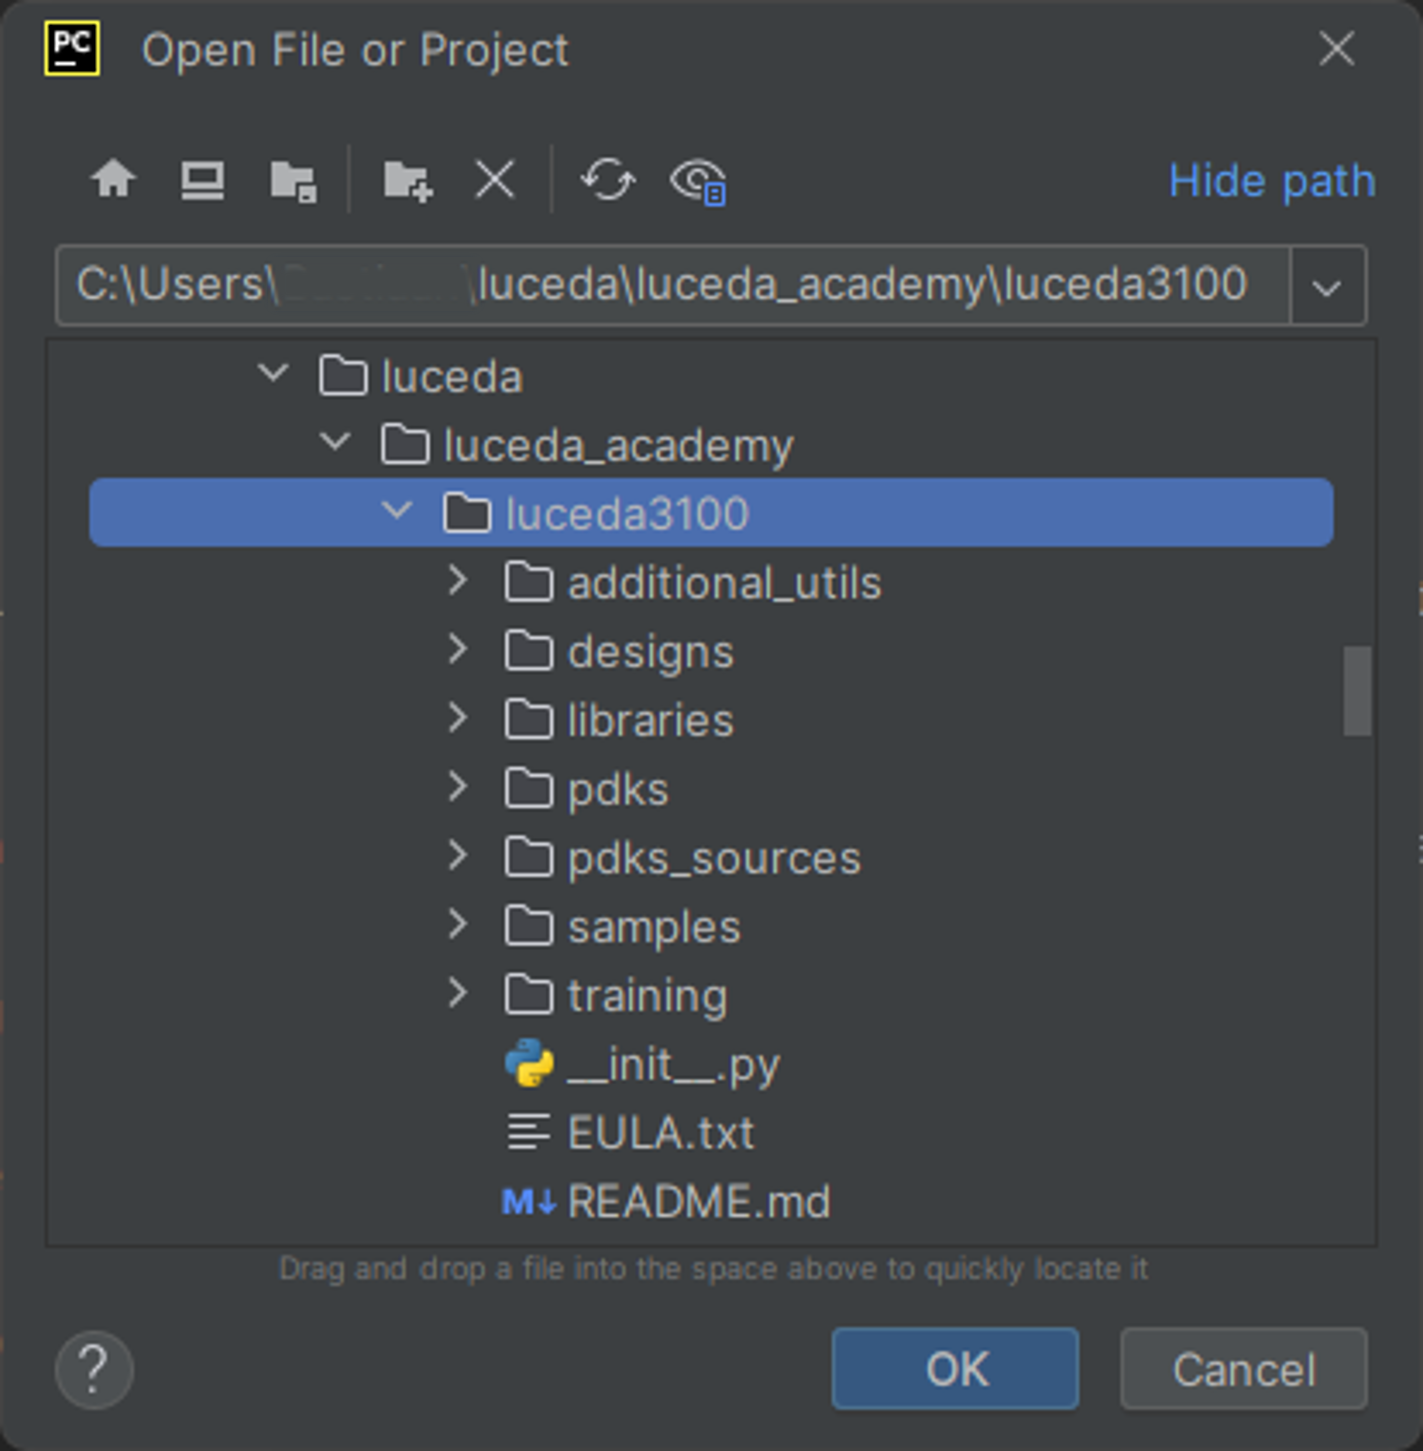
Click on and select the Luceda Academy folder (the default location is [USER]/luceda/luceda_academy/luceda[VERSION]).
Set up the correct Luceda Python interpreter:
Go to .
Click on ‘Add Interpreter’ in the top right of the window and select ‘Add Local Interpreter’. A new window will pop up.
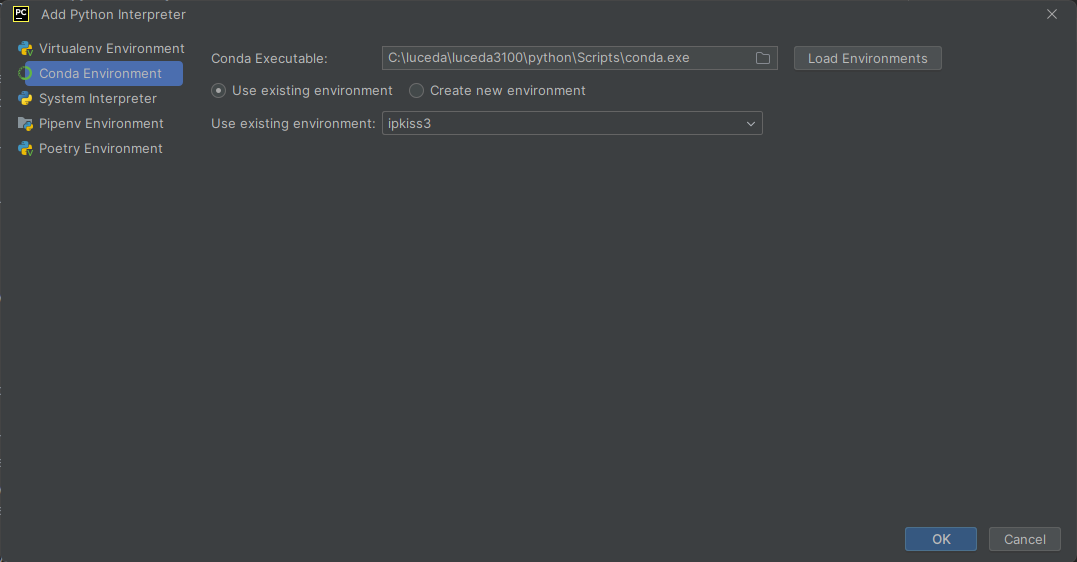
Select . On the second line, select the button ‘Use existing environment’. Then, in the field ‘Conda executable’, select the following file: ‘C:\luceda\luceda[version]\python\Scripts\conda.exe’. Next to that, click the button “Load Environments”. Finally, on the third line, select ‘ipkiss3’ from the dropdown list and click “OK”.
Installing a GDSII viewer
KLayout is an open source viewer and editor for GDSII and OASIS files. We found it to be an easy-to-use and very accurate tool for viewing GDSII files. It runs on Windows, MacOS and various Linux distributions.
To install KLayout, please go to http://www.klayout.de/ to download a copy.
Using KLayout, it is possible to open multiple files at once, overlay multiple files on the same screen, do simple edits, perform boolean operations, and so forth.
Design kits may come with a layer properties file .lyp which sets the layer names and drawing colors for easier viewing.
This file can be loaded through .
After installing KLayout, you can open GDS files from your file manager, or directly from within Wing IDE using the Open in External Viewer button as shown in the figure.
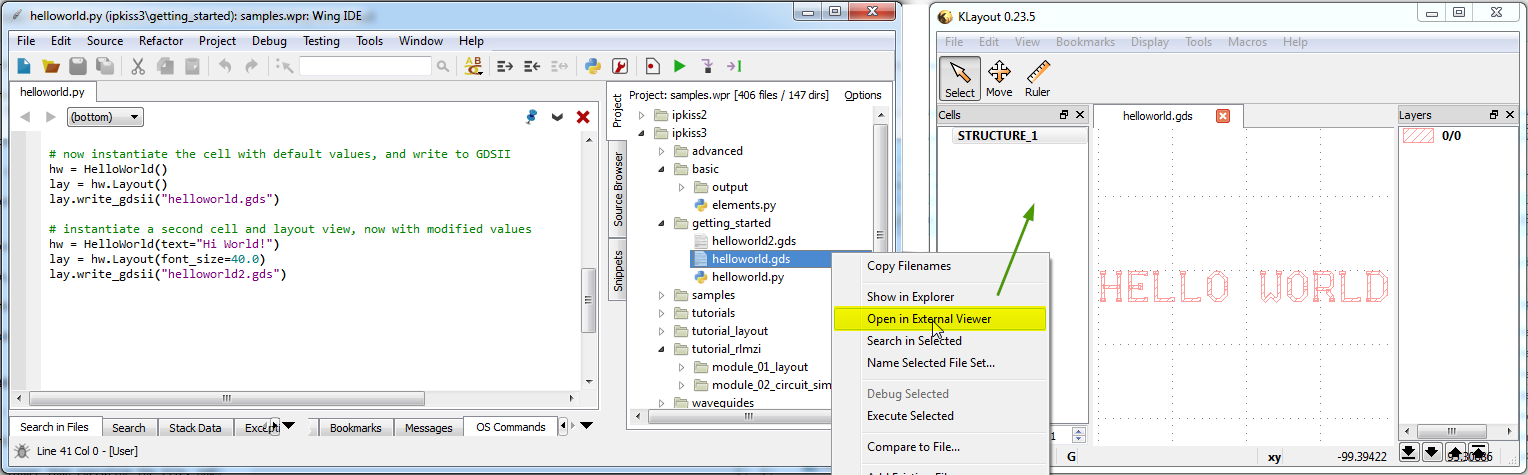
Open a GDS file from Wing IDE using the Open in External Viewer button.
For Link for Siemens EDA Users
The following section is relevant to Link for Siemens EDA users.
Installing Link for Siemens EDA
In order to run Link for Siemens EDA, you will need both the installation and the license from Mentor Graphics for L-Edit and a license from Luceda for IPKISS.
For IPKISS installation and license, please refer to the beginning of this page: Installing IPKISS
For L-Edit installation and license, please refer to the Mentor Graphics sales channel or through https://www.mentor.com/tannereda/ams-ic. Before you can get started using the IPKISS integration with L-Edit, you’ll need to obtain copy of Tanner L-Edit from Mentor Graphics. You must use L-Edit version 2019 or newer. If you’re unsure whether your version of L-Edit is compatible with IPKISS, feel free to ask us. We’ll be glad to help you.
Verify your installation
After you’ve installed Tanner L-Edit, IPKISS and your license, you should be ready to start creating designs. You can quickly check that everything is correctly set up by creating a test design. IPKISS contains a pre-made library called ‘demolib’. You can use it to test your installation.
Start Tanner L-Edit.
Select and open the demo design project of demolib. You can find it at
|samples_dir_win|/ipkiss_link_siemens_eda.In the command line window of L-Edit, you wil see a message saying that Luceda macros have been loaded.
Create a new design by pressing the shortcut n.
Instantiate a component by dragging it onto your new design.
You should now see the layout of your component. Note that it may take a while to load for the first time. Subsequent calls will run much faster once IPKISS is loaded.
Environment variables used by IPKISS
The following environment variables are used by IPKISS:
luceda_LICENSE: Folder to where license files are stored, orport@address.to.license.server. See configuring floating license. This variable is case-sensitive on Linux.LUCEDA_LOG_LEVEL: Logging in IPKISS. Empty or ERROR, WARN, INFO, DEBUG, TRACE.LUCEDA_LOG_DIR: Directory where log files for IPKISS are stored. When not set,%APPDATA%\luceda\logs(typicallyC:\users\yourusername\AppData\Roaming\luceda\logs) on Windows or$HOME/.luceda/logson Linux will be used.LUCEDA_FILE_LOG_LEVEL: Logging level for the file logs. Default isDEBUG. Possible values:ERROR(least details),WARNING,INFO,DEBUG,TRACE(most details).LUCEDA_PYEVAL: Path to the python interpreter which is used to run PCell evaluations from external tools. When using OpenAccess databases (e.g. in L-Edit or oascript), the Luceda OpenAccess PCell evaluator uses this variable to run the PCell evaluation in IPKISS. This variable is set into the user environment variables automatically when installing IPKISS (unless if you deselected the option). Change this value to another pythonw.exe if you want to change which Python interpreter is used.LUCEDA_EVAL_OPTS: This variable is only for use with Link for Siemens EDA to set options related to the Luceda evaluator. This is an advanced setting, aimed at users that need the flexibility.The variable controls how processes are launched. The value can be either SP or PL (single-process / process-per-library). If no value is provided, the default is to use SP (single-process). The IPKISS < 3.4 behavior is to do a process per library. SP has the advantage to mimic better the default IPKISS behavior where libraries can share cells.
System Requirements
Supported Operating Systems:
IPKISS is tested and supported on the following platforms:
Windows: Windows 10+
Linux: Centos 6.6+ (newer recommended). Ubuntu and other linux distributions are not explicitely tested, but in general work fine.
Hardware Requirements:
Ram Memory:
Linux: 4GB+ recommended
Windows: 8GB+ recommended
Disk Space: 7 GB free disk space required.
Link for Siemens EDA
The link with Siemens EDA requires L-Edit 2019.2 or newer, only windows based installations are supported.
Link for Ansys Lumerical
Lumerical version 2020a or newer is required.
Link for Dassault Systèmes Simulia
CST Studio Suite ® version 2019 or newer is required.