Release notes IPKISS 3.3.0
The IPKISS 3.3 design platform introduces a new placement engine and full optical netlist extraction.
The placement engine simplifies writing PIC layouts in IPKISS and makes getting started a lot easier. Netlist extraction can be used to verify layout connectivity and run circuit simulations directly from layouts that you’ve built before. In addition, in this release the software documentation has been extended with a samples gallery, new and updated tutorials, and a lot of other small improvements. The detailed account of improvements can be found in the changelog.
Highlights are shown below:
Spec-based device placement
In this release we provide a new way to define layout placement. We focus as much as possible on a declarative and expressive framework that’s easy to understand, use, and share with your colleagues. The framework is based on the idea that components are placed according to a set of specifications (for example, place, join, align, flip).
For example, given the following instances and specifications:
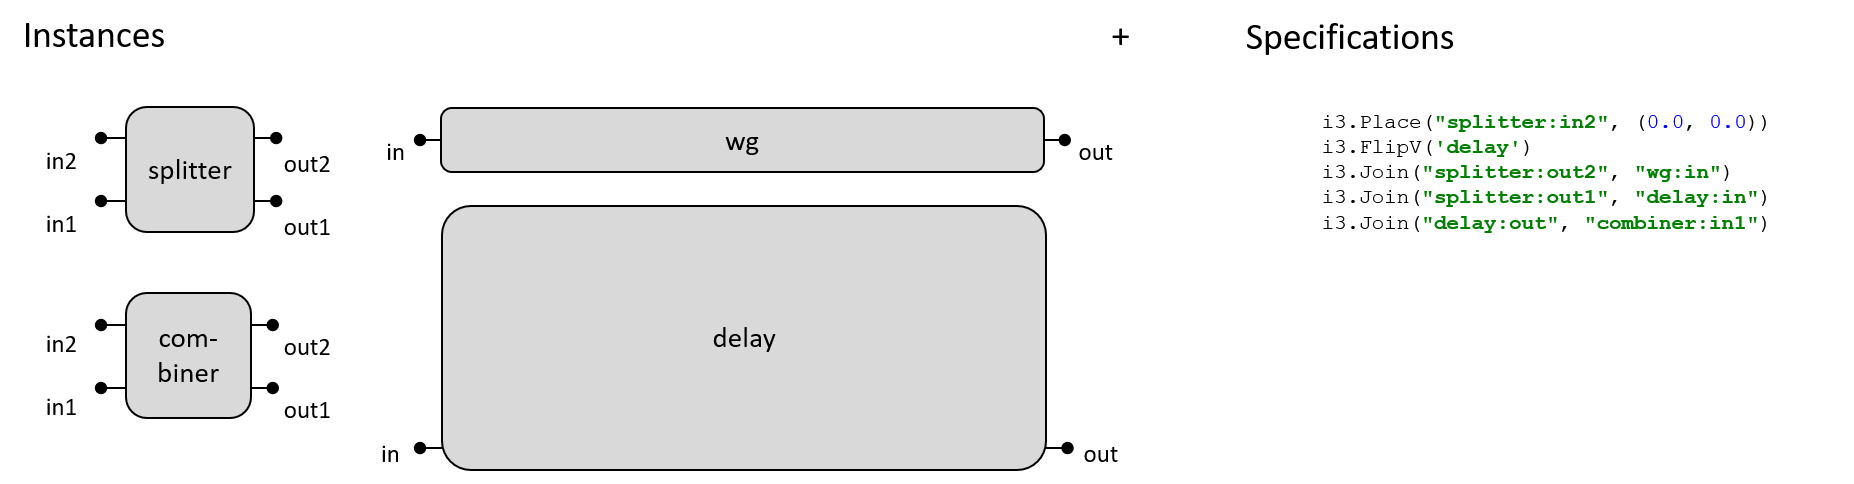
This gives us the following placement as result:

Please check the placement tutorial to get started, or check out the list of possible specs in the API reference.
Netlist extraction
In this release, we added an optical netlist extracter which extracts the terms, instances and optical nets from any given IPKISS layout. It’s available as a view to add to your PCell (i3.NetlistFromLayout).
The netlist can then be further processed, either to check for design errors, to compare versus other netlists, or to directly run circuit simulations (layout-driven circuit simulation).
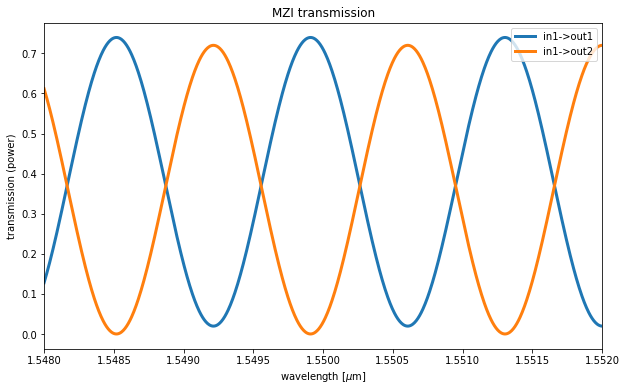
Given the previous example of a MZI with spiral (full example), this is the extracted netlist:
mzi_nl = mzi.Netlist()
print(mzi_nl.netlist)
which prints
netlist:
--------
instances:
    - delay : <Single instance in netlist of mzi_spiral>
    - splitter : <Single instance in netlist of DC_L6.000>
    - combiner : <Single instance in netlist of DC_L6.000>
    - wg : <Single instance in netlist of mzi_wg>

terms:
    - in1
    - out2
    - out1
    - in2

nets:
    - splitter:out2-wg:in: <OpticalLink splitter:out2 to wg:in>
    - combiner:out1-out1: <OpticalLink out1 to combiner:out1>
    - combiner:out2-out2: <OpticalLink out2 to combiner:out2>
    - in1-splitter:in1: <OpticalLink in1 to splitter:in1>
    - delay:in-splitter:out1: <OpticalLink delay:in to splitter:out1>
    - combiner:in2-wg:out: <OpticalLink combiner:in2 to wg:out>
    - in2-splitter:in2: <OpticalLink in2 to splitter:in2>
    - combiner:in1-delay:out: <OpticalLink combiner:in1 to delay:out>
And here’s a circuit simulation based on the extracted netlist and the default model parameters:
mzi_cm = mzi.CircuitModel()
sim_wavelengths = np.linspace(1.548, 1.552, 1001)
mzi_S = mzi_cm.get_smatrix(wavelengths=sim_wavelengths)

plt.figure(figsize=(10, 6))
plt.title("MZI transmission")
plt.plot(sim_wavelengths, np.abs(mzi_S["out1", "in1"])**2, linewidth=3, markersize=7, label='in1->out1')
plt.plot(sim_wavelengths, np.abs(mzi_S["out2", "in1"])**2, linewidth=3, markersize=7, label='in1->out2')
plt.xlabel('wavelength [$\mu$m]')
plt.ylabel('transmission (power)')
plt.xlim([sim_wavelengths[0], sim_wavelengths[-1]])
plt.legend(loc=1)
plt.show()
Documentation improvements
Various small inaccuracies throughout the documentation have been fixed, and a new landing page was created.
The tutorials have been reorganized so it’s easier to reach the relevant content for beginning users.
API reference has been extended in several locations.
More technology-related documentation. In particular, we documented the required technology keys to build your own PDK.
New samples gallery.
New layout tutorial.
The most recent version of the documentation is now by default hosted on http://docs.lucedaphotonics.com/index.html (without a version number in the URL). If you want to browse old versions of the documentation, you can launch the Luceda Control Center (the version is displayed in the window title), and open the documentation from there by clicking the ‘Luceda documentation’ button.